Long time no craft!

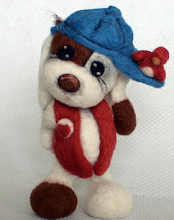
Well guys I thought I'd share with you what I've been doing over my holiday break. This is a wee bjd doll I finally cast in resin... being the first there were certainly some learning curves! And I also found how easy it was to carve and sand so this girl turned out very differently from the original wee doll I molded!
I blushed and did her face in pastel chalk which wasn't as hard as I imagined but still came with some problems!

The first face up was just what I wanted but until I held her in natural light I didn't see some smudges that had been there under one of the sealer coats! So being me I thought maybe a light wet sand would remove them... well yes as you can imagine I had temporarily lost my brain and tried it!!! Long story short do not make the same mistake... I then ended up having to remove all the face up which unto itself was very very difficult and a lot of it wouldn't move in the creases!!!!! So redid the face up and after taking pictures I can see where  need to go over some colours... but over all I'm thrilled with her :o)) ... so just need to do the touch up and blush her hands, stick on the back of her head and give her some hair and clothes :o))))))

Hope you like....


Hugs,
Sharon
Ps will take some cuter pics later as these are terrible and don't do her justice!

Hey Guys found this great auction place yesterday ... so excited by the prices stuff was going for I had to sign up LOL. They have loads of electronics like Dyson vacuums,  laptops, iphones, ipads, and more... even some girly stuff like handbags and perfume! Its called Planet Bid and if you haven't checked it out you have to! Theres a Planetbid in the US , Oz, and even here in little old NZ just click the countries to go have a look you will be very surprised if you've not already found it.
How it works, well it pretty simple you buy "freebids" which gives you a certain amount of bids to use... you have to be careful though as you can go crazy and use a few too many but hey you have to get your feet wet and try to get a feel for the auction :o))...since everyone is paying for bids thats how they are able to let stuff go for very very little money! Was up till very late last night waiting for a macbook pro to count down safe to say I blinked and missed the end of it.. (next time I shall use toothpicks to make sure I don't blink LOL)..really amazed me as that mac went for 54c nzd!!!!!!!This place is so much Fun even if you dont join up you still have fun just watching!!!LMAO
There are other ways of getting freebids like bidding on them ... or if like me your just starting out and want some free freebids then write up a blog poat like I have here send them the link and they will slip you a few freebie freebids...Planetbid also offer a points program where you earn points for bidding that you can spend.

Lastly if anyone does join up and have the inclination could you pop my user in as ref when you sign up so I can get some more freebie freebids  my user id is Shawkes :o))

here's the sculpt so far

Well guys I thought I'd post up pics of that sculpt I was doing for my interview... sad to say things didn't quite go to plan in the last firing ... safe to say in my hurry I forgot that you do not fire your sculpt standing as when the clay starts to heat it becomes like rubber ...so the weight of the upper body made her lean and she suffered broken legs... well I super glued them the next morning and well that didn't take as well as it should ...so will have to dig out the broken area and fill with new clay... then I will have to readjust the bottom of her stand so she's not leaning painfully off balance... unfortunately the interview is today so not going to happen... still wondering if I should take her anyway...apart from the firing problems she's still a good sculpt!
Well here's some pics :o))


Well guys I got a new Camera today and just love it to bits... boy does it take fantastic pictures :o)) 
And yep you guessed it I had to post some LOL
This is the camera here... it's a panasonic fz35... isn't she a beauty :o))

these ones I took in the garden as I really wanted to see how the colours came out and was also testing the macro...


These ones are of my half finished Dragon feltie ... he has a lot of tweaking to go yet ... need to straighten up his eyes!


These ones are ones you've already seen but just wanted to show them in a better light so to speak LOL


Next is the flowers I made from Khris Tut ...link can be found in last post :o)) Yes Khris there had to be purple in there LOL

Lastly is the sculpt I'm doing at the present to come along to my interview... I'm applying for a position is this semesters class for a Cert of design and visual Arts ... wish me luck ..thats happening on Tues! Told Andrew I wasn't nervous as I should feel right at home as they will no doubt be as weird as I am LMAO


what I've been up too...

 Have I complained lately about how much I hate my camera! Well consider it a reminder LOL
Okay well this week I've been doing some felting and have almost finished this guy ...he needs a book yet and am thinking about adding in a couple of friends on either side... sorry for the pictures he so deserved better!


I've also decided to save up some money and get some silicone and resin and try my hand at molding and casting that BJD doll of mine... I'm hoping it wont be a flop but we have to try these things :o))
Today I decided to get out the polymer clay and do some sculpting ...I haven't played with polymer in so long and I just had to try out a tut I found on the net ... they are spoon dolls ...if you want to take a peek here's the link :o)) if you click on the Tut link on that page you'll see the step by step instructions... 
Here's my guy ... I think he's going to be a jester ... 


now here what happens if you don't clean your tile before you put your sculpt on for cooking... Yesterday I had used that tile to make Mr Dragons wings on and I had been a bit messy with the glue and had forgotten about it ... so I will have to cut off his ears and re do them then dig out the burn on the neck and re fill!


How cool are these!

Well girls just had to share this every cool wee creation from a couple of talented girls from our yahoo CRAFT group.. these are so cute and so simple and easy to make and would look absolutely perfect as embellishments .. I could see a few felties that would look great perched on there maybe even a picnic LOL anyway have a looks see at the link and save it :o))
Link to Khris's blog and the Tut... http://www.sewprimkhris.blogspot.com/

Bjd doll

Righty well after taking her apart and taking away that nasty leather I popped in white felt instead ... so re strung her then thought I'd attack the knee joints in hopes of her being able to stand... I drilled 2 holes through the upper and lower parts of the joints then inserted a brass bar, so each section of leg is individually threaded hoping for a tighter joint ...also I popped in a brass bar across her hips in hopes of making the top of the legs more stable for standing... strung her up again but unfortunately she is going to be a sitting, laying or kneeling doll... she is just too heavy to stand ...I guess this happens often with ooak dolls made from heavy paperclay... am hoping to try doing some resin ones in the future so they being lighter shouldn't have the same problems!
Well I did buy her a nice wig from ebay last week and it arrived yesterday so this morning I have restrung her for the last time and have put the back of her head back on, got her wig on and have styled it with wee pigtails :o)) I'm thrilled with how she looks even though disappointed she'll not stand!

Well here's some pics... so wish my camera took better pics but it doesn't...


bjd strung!

Righty here she is all painted and strung... I was originally just going to knot the elastic at the top of her head and secure it beneath skin level then clay over to hide... but I chose a heavier elastic and being 8 ends it just wouldn't be able to secure properly... so this morning I gave her a bit of brain surgery and cut off the back if her head and then drilled a couple of hole and threaded a solid brass pipe ... this is what I secured the elastic too... good lot of knotting and before I attach the back of her head I'll pop some superglue on the knots so they wont come loose.... so the last problem will be the fact the black leather is leaving smudgy black marks... this will take a bit of puzzling .... any ideas?
Okay so here are the pics :o))


another bjd update

Wow guys I'm on a roll ... another update and not long between LOL
Here's a pic of the face painted ... unfortunately my camera is crap and it doesn't take great piccies ... I did one of the pics in gray scale which I love :o))... you'll note in the colour picture that there is some colour missing on the right eyelid... have fixed that LOL


Bjd doll skin paint

Right have to remember what I've done since I last posted an update....
Now I did find a couple of things that just didn't sit right after the last test stringing, 1 the right knee joint was not allowing the thigh and lower leg pieces to touch as they should when she's in standing position so rather than digging out the 2 pieces further to make the cups where the joint sits deeper I made that joint just a touch smaller...this worked great and isn't noticeable and I'd be the first to notice it and that would bother me LOL... so after I made that joint smaller I restrung again and found I still had some problems with the right leg... when she stood her right knee would bend...after looking and looking I found the lower right leg was about 2mm longer so she had to have that cut off... safe to say after restringing all was well so I then started painting her skin tone... ended up with a few more problems ..this time not with the doll herself but my mini compressor died ...which isn't surprising as Andrew my partner confessed to dropping it ... so out we went and got a new one which he paid for :o))... well got it home and set it up then found I didn't have the the wee connection needed to attach my air brush gun!! So had to go find one of those and instead found a nice wee new gun which was only $25.00 so was thrilled... got everything hooked up finally and what can I say but that wee cheap gun works better than my imported more costly one LOL

Right after blabbering on here are the pictures I've taken of her as she looks at present ... but I'm now going to sit down and give her some highlights and a bit more of a face... but before that I will clean up around her eyeballs just a bit as there is still a wee bit of paint I've not taken off yet. But once thats done she'll be ready for her last stringing ... Yay!!! :o))
So watch out for more piccies as I'm gonna go for gold and will work on her straight till she's done!

Any questions just ask :o))


Stuff I've been up to...

I've been making a few Christmas pressies lately... I've 2 finished so thought I'd show you all :o))
The first is Eeyore for Andrew's nephew Harper who is now 1 whole yr old... I will be doing another for him it's a Macaw hand puppet so will show piccies when I've done :o))
The second is a very cute Turtle for Andrew's Mum since she just loves Turtles...
Links... Turtle pattern click here.... Eeyore pattern click here


Now the last is an update on the Bjd dolls... I've added the eyes finally to the big one they are the diy eyes and couldn't have been more pleased with the results! So simple to just print out the coloured eye you like and place in the indent then snap the clear over the top!... made hands and feet... she's had numerous coatings of filler/primer and sanded sanded and sanded ... also I reshaped her knees and cut off some of her lower legs ... I think she's almost ready for proper painting and putting together... but will do a test stringing and see who she moves... might have to change the knees again but we will see :o))

 
Well thats it for now ... will update again soon :o))
Hugs,
Sharon


Unicorn Horn and wings

Well we are nearly there guys... this is the last part ...so post links to me if you want to show off your Unicorn!
Here's a pink one in the processes of being created... it's gonna look fantastic :o)) visit Sharon to see how she's going!

Lets get going... I'm going to start with the wings ... so here's a pic of what you'll need... please note I am using cernit but that's not a requirement ...you any polymer they will all turn out the same :o))


 next I've rolled out about half of the pkt of clay ... probably about 1-2mm thick..then I've cut 2 pieces of wire and folded them in half and twisted it folded side till it's about an inch long... then I cut the wire to the length I wanted by holding up to the side of my wee horse..
here's a pic of one piece of wire cut on top of the white rolled out clay...


once you've cut both the wing wire to match lay them on the clay making sure the twisted end is hanging over the edge of the clay... this this then end we will insert into the horse so needs to be as clay free as you can get it!... trim the clay so it's about 1/2cm away from the outer edge of the wire ... rub a little baby oil or liquid clay over the wire and overlap of clay... then fold that clay edge over the wire and press it down so that it's well attached to the clay... then slice down the middle of the wings .. like below...


Next give the wing some shape by cutting it like this...remember to make sure you have a pair ...we don;t want to have 2 lefts or rights!

Right with your knitting needle begin to press and drag it through the clay from the wire to the cut edge... press harder as you get toward the cut edge so that your tool goes through the clay all the way to the plate...my plate you can see in the picture is a tile I use for making then baking on.


Now after you've done that you should have something that looks a bit like mine here...


Once you have both wings done lift them off your surface as gently as you can ...we don;t want to rip them or pull the wire out...once you have lifted bend the wire into the pose you want ...then repeat on the other...they don't have to be exact so don;t try else you'll be at it all day and frankly I really love that mine don't match...makes for a more interesting piece!
Righty then place them on some fiber fill ready to be baked soon as we've done the horn...
For the horn all we do if take a small length of wire and twist it  to the top ...this only needs to be about an inch at the most so don't twist a huge length!... roll out a bit of clay to look a bit like a carrot then insert the wire into the carrot... now to finish it off I rolled out a very skinny piece of clay then wrapped it around sort of like a spiral ...


Next pop everything in the oven and bake as the direction tell you on the packet...
Okay when cooked and cooled it's time to decorate as you'd like... for me I brushed some glue over just the spirals of the horn and sprinkled with glitter... then because I'm a bit of a fire bug I lit a candle and just gently burned it just enough to take the brilliant white and cut down on the sparkle of the glitter... now I chose to do this as my wee guy has a lot of gray in him and the white was just too white ...for the wings I just burned them again just gently to take away the "white"!
For attachment use a needle tool or a doll needle and poke it into the place were the wing will be attached... wriggle it around and make sure it's wide enough to insert that wire on the wing... if the wire is too long trim it off so it's shorter but not too short as we want it to be firmly in there... when your happy with that use a drop or 2 of superglue on the end of the wire and also the bit of clay at the top of the wire... re-insert and hold till it's taken... then bend the wire to the angle you like... please don't try and bend the wings themselves else they will break!... repeat for the other wing and also for the horn...when your done you should have something like mine here :o))


Well we are all done... I hope you enjoyed and will send me some pics :o))

Hugs,
Sharon