Well guys I've been very busy lately with more than one thing as usual LOL
I'm feeling very proud this week as I managed to give up smoking... boy was that the hardest thing I've ever had to do!!!
I've done some more on the BJD doll but haven't had time to take some pictures as yet but will tomorrow :o))
Also I've made 4 new sculpts none of them any bigger than 5" .... These I will be selling on my site as soon as I get it redesigned... yep that time again LOL I plan on attacking that tomorrow in between sculpting and sewing.... Speaking of sewing I actually made a wee quilt! Not totally finished as yet but I'm very thrilled with it since it's my first :o)) The pattern for it is from Cath Walker and is part of the Teddy Club ... if your wondering what that is, it's a monthly mail out from Cath with Teddy themed stitcheries and projects... she only charges $10. aud ...well worth it as you get so much more value for your buck!! If you want to go have a looksee or contact her about it there's a link to her blog over to the right or click here :o))
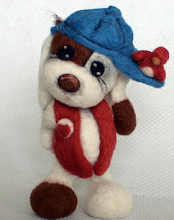
Okay so here's the pictures of those wee sculpts and the quilt so far I was talking about earlier... If you are interested in the 2 I have left and can't wait till I get them on my site feel free to email me ...

 Adopted
 Adopted
 This wee girl will be $60.00 + shipping
 This wee boy will be $50.00 + shipping
Okay thats it from me for now... hope to be posting more pics of the BJD tomorrow ... :o))
I'm feeling very proud this week as I managed to give up smoking... boy was that the hardest thing I've ever had to do!!!
I've done some more on the BJD doll but haven't had time to take some pictures as yet but will tomorrow :o))
Also I've made 4 new sculpts none of them any bigger than 5" .... These I will be selling on my site as soon as I get it redesigned... yep that time again LOL I plan on attacking that tomorrow in between sculpting and sewing.... Speaking of sewing I actually made a wee quilt! Not totally finished as yet but I'm very thrilled with it since it's my first :o)) The pattern for it is from Cath Walker and is part of the Teddy Club ... if your wondering what that is, it's a monthly mail out from Cath with Teddy themed stitcheries and projects... she only charges $10. aud ...well worth it as you get so much more value for your buck!! If you want to go have a looksee or contact her about it there's a link to her blog over to the right or click here :o))
Okay so here's the pictures of those wee sculpts and the quilt so far I was talking about earlier... If you are interested in the 2 I have left and can't wait till I get them on my site feel free to email me ...

 Adopted
 Adopted
 This wee girl will be $60.00 + shipping
 This wee boy will be $50.00 + shipping
Okay thats it from me for now... hope to be posting more pics of the BJD tomorrow ... :o))
Hi everyone :o)) ...sorry I've been slack in posting ...been doing this and that including recently trying to stop smoking!! Well that isn't going so well but I haven't given up on the idea of quitting and will do it!!
Okay besides that I've been playing with making my own bjd dolls... I made one last year for my good friend Sharon nz ...and decided to give it another go! This girl is much bigger than the first and is a challenge as I've never sculpted anything as big...she'll be nearly 20" when done!!
It's a real puzzle as each piece has to fit and move within the other pieces ...so more trial and error at present...
Here's some pics so far :o))

 I ended up cutting her neck off and re doing it as I didn't like the angle... also I added a ball to the top of the heck that sits in a cup inside the head...works wonderfully!!

Here's something else I've almost finished lately... he's a polymer dragon and will sit in the hands of his friend...only needs his wings :o))
 Well thanks for dropping by... I will have more pics as the bjd comes along :o))
Hi guys :o))
Thought I'd show you some of the things I've been doing lately... a few I can't show as they are for an Advent swap with the CRAFT group... we at Christmas time buy or make 24 small gifts for our partners to open each day before Christmas and one main that's bigger... well I can't show those as they need to be a secret for a bit longer LOL
I can show you these though...
Inside and outside of a reversible toy bag and matching slippers for our new nephew Harper whom is only a couple of months old now...


I can show you these though...
Inside and outside of a reversible toy bag and matching slippers for our new nephew Harper whom is only a couple of months old now...


Next is a bag same pattern as the above one but done in suede and has a lattice worked pockets... this is for my Auntie...
 Lastly for now here's a table runner that I'm very proud of ... First time for stippling and it's not to bad if I do say so my self LOL
The blocks aren't done by me they are the work of someone in our CRAFT group she did them for me in payment for one of my dolls...and boy are they fantastic blocks so neat... I'm hoping to do some as neat soon :o))

Hugs,
Sharon
Well guys I'm so sorry I've not finished the Caterpillar... my only excuse is Christmas!! I've been flat out trying to get all those things made... I will update and add some pics of what I've done very soon :o))
Hugs,
Hugs,
Sharon
Just when you thought No more Balls LOL ..
Here we go again... This time we are going to make 2 sets of 2 larger balls (this larger ball would be about the size of a normal marble), a med ball, a small ball and 8 tiny balls...one set for each arm and hand.... they will be strung like in this picture... Note each ball will still be movable so the hand can be posed..
Here we go again... This time we are going to make 2 sets of 2 larger balls (this larger ball would be about the size of a normal marble), a med ball, a small ball and 8 tiny balls...one set for each arm and hand.... they will be strung like in this picture... Note each ball will still be movable so the hand can be posed..

Here's how it looks when strung together...

Note here I've strung the 2 fingers so they look like they are bent...

Look how tightly I've sewn it to the body....

Here he is so far with both arms attached...Note positioning of the jointed arms...

Just another view for reference...also note I have felted a wee ball on the end of his tail to cover the knot of stringing him together...

Lets attach the head now... you will have this indentation at the top of the neck where there is the knot from stringing the balls together... use this as the entrance of your needle when attaching his head...

Thread the needle with the threads that you used to attach the eyes...
Insert the needle as above and exit between the neck ball and the next one... this is to hide the knot...

Tie the ends very well... I knot them twice just to make sure nothing undoes...

Now I just had to play with poses a bit... LOL
Mmm what do you think...

I wonder...

I surrender!!

Who me??? I'm innocent honest ...

Right I'm off...

Well hope your enjoying this so far... we are nearly finished :o))
Hugs,
Sharon
Hugs,
Sharon
Well girls I'm sorry this is later than I said... My only excuse is I decided to do some more to it before I uploaded LOL
Okay to finish off the head he needs some antenna ...to do this I felted 8 very small balls a little bigger than his nose... Sharon time to get those forceps out LOL
Once you've done the balls string them together ...remember create character by making one or both not straight!! Then using the same method as attaching his hair needle felt a tuft on each of them.


That ends the head for now... Lets get cracking on the body...
String the balls of the body together knotting the thread on each side of the balls... When you've done that make another 6-8 balls..half felt these and then felt to the bottom of body for legs... Use the muzzle attachment method to felt them on... once you have them in place felt the bottoms flat so he can stand unassisted..

That's it for this part ... next one is about to follow!!
Hugs,
Sharon
The Head..
Lets do some more work on the head...
Use a finer needle for this part...I used a 38 gauge needle. This needle is a great all rounder needle and one you should have plenty of !
Using this needle needle felt the eye sockets in as I have in below pic...
Lets do some more work on the head...
Use a finer needle for this part...I used a 38 gauge needle. This needle is a great all rounder needle and one you should have plenty of !
Using this needle needle felt the eye sockets in as I have in below pic...

Using normal black beads..I used 4mm Onyx ones as that's what I have ...but any black bead in whatever size takes your fancy will do.. Thread with very strong upholstery cotton or waxed sinew ..do not use dental floss as it breaks down over time and also turns a nasty yellow!!
 Attach both eyes by going trough eye socket and out through the neck area...pull firmly and knot securely ...
Lets add some whites to under the eyes and I think I'm going to do something here I've not done to any bear in a few years and that's add a black edging all around the outside of the eye!!
In this picture you can see the amount of wool or fiber you'll need for this part ..note the black has been twisted into what could look like a thread... to do this place wool between thumb and forefinger and roll it... this is important as it will be easier to attach neatly...

Needle felt the white wool only around the lower half of the bead..refer to below picture..

Then add the black outline around the whole eye... first felt one end in place and gently felt the rest down following the line of the eye...refer to below pic as guide...

Here's what we should have at this point... just remember in needle felting no 2 characters can ever be identical so yours will look different from mine!!

Now for the nose... use any colour you like here ..I'm using just plain old black as this guy will have red/yellow hair and any other colour may dissapear so think about the colour of your guy's hair and decide what will look best for your one...
Below is a pic of the amount of wool I'm using to create his nose..

Felt tha bit of wool into a ball ...this is a tiny ball so be very careful with your fingers and as my firnd Sharon says don't look up while your felting esp. on the downward thrusts LOL
Attach that tiny ball to the top of the nose using the smae method as I showed you in attaching the muzzle ... refer to that video if your unsure..
Attach that tiny ball to the top of the nose using the smae method as I showed you in attaching the muzzle ... refer to that video if your unsure..


How to attach hair... Take small pieces of wool or fiber and place accross area you want to apply it to... needle felt it to the area using your 38 gauge needle only in the center part as here in this picture...

This is how it will look...This may take practice so use a spare ball and practice first!!

Well here's the head after I've attached his hair...I did a Mohawk but you could do any other kind of hair do you want... try a whole head of rainbow hair if you wish to :o))
Next part will come in a couple of hours....


Any questions? Dont be shy post to me and I'll answer :o))
Subscribe to:
Posts (Atom)